
Connect Google Ads & set up conversions
This guide walks you through linking Google Ads to FunnelTrack, turning on Enhanced Conversions, and mapping FunnelTrack events to Google Ads conversion actions so every lead and sale is reported with full attribution.
- •Admin access to your Google Ads account
- •Your 10-digit Google Ads Customer ID
- •The Google tag (gtag.js) installed on your website & landing pages
- •About 10–15 minutes
Connect Google Ads to FunnelTrack
Link FunnelTrack to your Google Ads account so we can send conversions on your behalf.
Add the FunnelTrack service account as a Standard user
FunnelTrack connects to your Google Ads account through a Google service account. Granting that account access is the entire connection — there's no manager (MCC) link to request or accept.
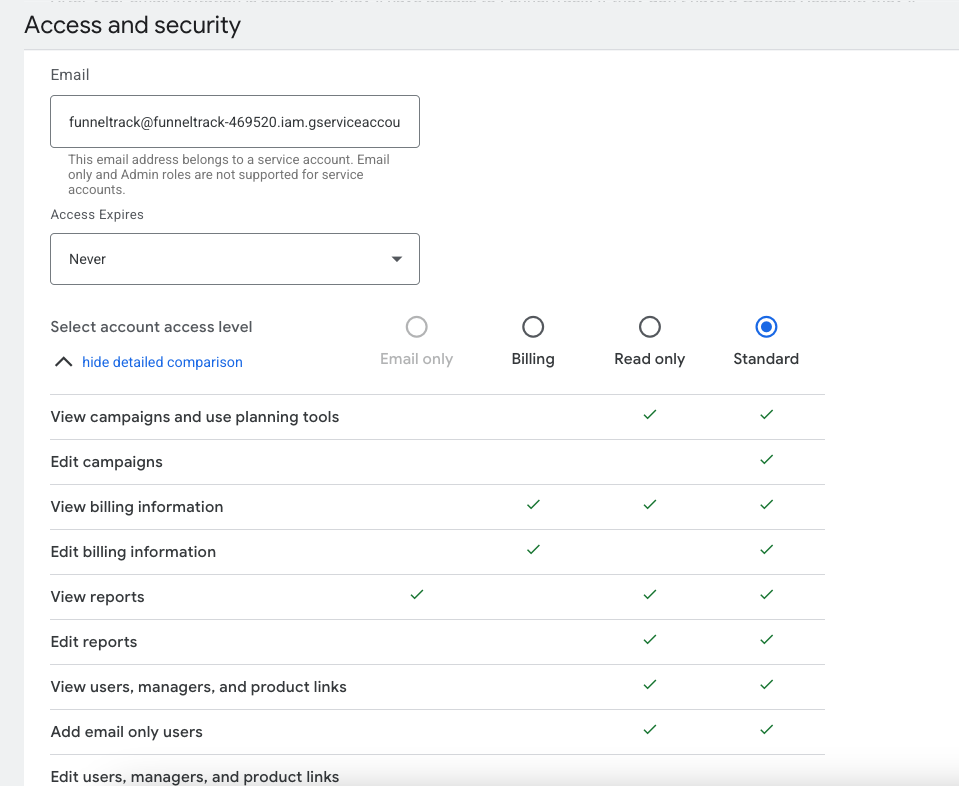
In Google Ads, go to Admin → Access and security → Users, click the blue + button to invite a user, and enter the FunnelTrack service account email:
funneltrack@funneltrack-469520.iam.gserviceaccount.comSet the access level to Standardand send the invitation. Service accounts activate immediately — there's no acceptance step on our end. This grant is what lets FunnelTrack call the Google Ads API on your account's behalf to upload offline conversions.
Find your Google Ads Customer ID
Your Customer ID is the 10-digit number in the top-right corner of the Google Ads UI, formatted like 123-456-7890.

Paste your Customer ID into FunnelTrack
In FunnelTrack, go to Integrations → Google Ads and paste your Customer ID into the field. The dashes are optional — FunnelTrack handles both formats.

Confirm the additional steps and click Connect
Once the service account has been added and your Customer ID is in, check the "Additional steps completed" box and click Connect.

Prepare Google Ads for conversions
A few one-time settings inside Google Ads so it accepts the conversions FunnelTrack sends.
Verify the Google tag is on your site
Google Ads needs the standard Google tag (gtag.js) installed on your funnel pages so it can match server-side conversions back to clicks. In Google Ads, go to Tools → Measurement → Google tag and confirm your tag is firing.

Turn on Enhanced Conversions for leads
In Google Ads, go to Goals → Conversions → Settings and expand the Enhanced conversions for leads section. Toggle Turn on enhanced conversions for leads, choose Google tag as the method, and save.

Turn on Enhanced Conversions (with Google Ads API)
Below the leads section, expand Enhanced conversions and turn it on. Choose Google Ads API as the method — this is how FunnelTrack pushes hashed user data server-side.

Setting up conversion tracking
Deploy the FunnelTrack pixel, create your conversion actions in Google Ads, and map each event in FunnelTrack.
Deploy the FunnelTrack pixel
Add the FunnelTrack pixel to the top of the <head>on every page of your website and any landing pages — place it in your theme file or global header so it loads site-wide. You'll find the pixel script and verification status in the Pixel section of your FunnelTrack account.

Create your conversion actions in Google Ads
Create every conversion event you want to track in Google Ads as the Conversions offline type. From Google Ads, go to Goals → Conversions → Summary and click + New conversion action for each event you want FunnelTrack to send.

Enable an event template (or create a custom event)
In FunnelTrack, open the source you want to route to Google Ads (e.g., ClickFunnels → Google Ads). Toggle on a recommended event template, or click + Add More Events to create a custom one.
Paste the event name from Google Ads
In FunnelTrack, type the exact event name as it appears in Google Ads under Goals → Summary. This is how FunnelTrack tells Google Ads which conversion to credit.
Grab the Conversion Action ID & paste it into FunnelTrack
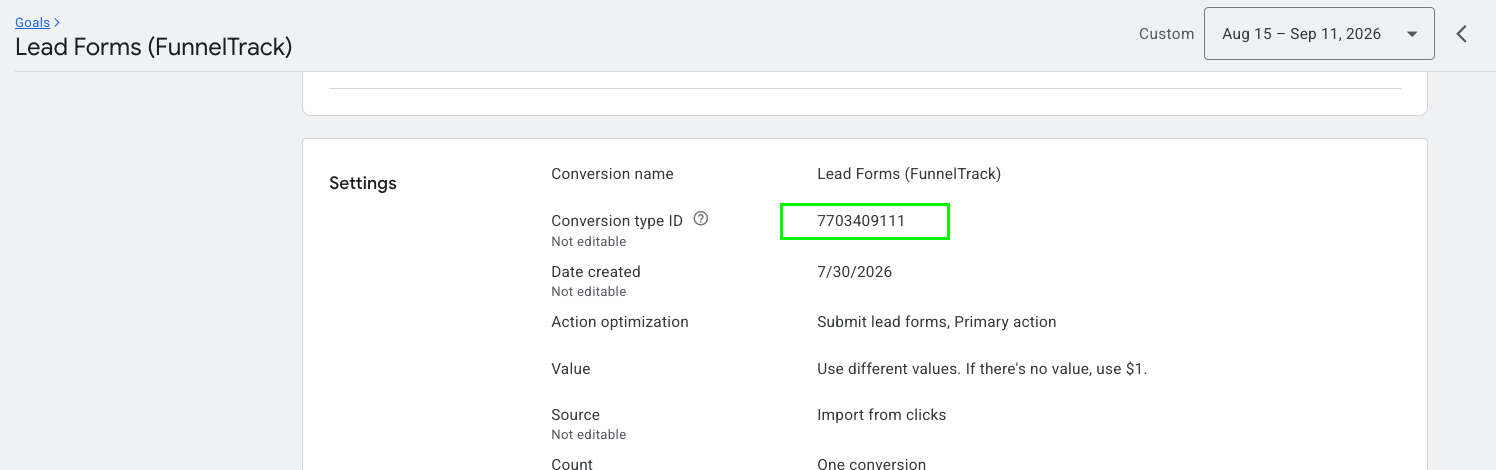
Back in Google Ads, click into the conversion action you want to map. Once the conversion action is created, Google Ads shows the Conversion Action ID in the settings section of the conversion. Copy that ID and paste it into the Conversion Action ID field for the same event in FunnelTrack.

Save your changes
Click Save Configuration at the top of the routing page. Repeat steps 2 – 5 for every event you want Google Ads to count — leads, sales, upsells, etc.
Test & verify
Trigger the action on your website (submit the form, complete the checkout, etc.). Then open Event Delivery Log in FunnelTrack. You should see two rows for the event: an IN row showing FunnelTrack received it from the source, and an OUT row showing the dispatch to Google Ads marked delivered.

Need a hand?
If anything in this guide didn't match what you're seeing in Google Ads or FunnelTrack, open a support ticket in your dashboard and we'll get you sorted.