

Connect Stripe & track checkout, subscriptions, and recurring payments
FunnelTrack receives Stripe payment events server-side via webhook and stitches each conversion back to the ad session that drove it. The purchase, trial, or renewal you send to Meta, Google, TikTok, and the rest carries the click ID, hashed identity data, and session context from the original click.
- •An active Stripe account with permission to add webhook endpoints and create API keys.
- •The FunnelTrack pixelinstalled on the page that starts checkout, so the visitor's session is captured before they pay.
- •The ability to pin
ft_sidandft_uidinto your Stripe Checkout metadata (orclient_reference_idon a no-code Payment Link). See step 5.
1. Stripe events FunnelTrack supports
The conversions FunnelTrack emits from Stripe, and when to use each. Works with both Stripe-hosted checkout pages and embedded checkouts.
FunnelTrack tracks Stripe-hosted checkout pages (a Checkout Session that redirects to checkout.stripe.com) and embedded checkouts (embedded Checkout or the Payment Element on your own page). In both cases you pin ft_sid and ft_uid onto the Checkout Session when you create it server-side (step 4), and every downstream event inherits the attribution.
stripe/checkout.completedFires on checkout.session.completed, with revenue from amount_total. Your primary Purchase conversion. Covers Stripe-hosted and embedded checkouts, one-time payments, and the first charge on a subscription bought through Checkout.
stripe/trial.startedFires on customer.subscription.created only when the status is trialing. Use it to optimize free-trial funnels (map it to StartTrial). A subscription that starts paid is captured by Subscription Activated instead, so the two never double-count.
stripe/subscription.activatedThe first real charge on a no-trial signup. Derived from invoice.payment_succeeded where amount_paid > 0 and billing_reason = subscription_create. Use it as the paid-subscription conversion when you don't sell through Checkout, or to value activation separately from the initial checkout.
stripe/subscription.renewedEvery renewal, plus the first charge after a trial converts. Derived from invoice.payment_succeeded where amount_paid > 0 and billing_reason = subscription_cycle. Use it to feed real recurring revenue and optimize for lifetime value.
stripe/subscription.canceledFires on customer.subscription.deleted the moment a subscription ends (manual cancel, period-end cancel, or terminal dunning). Use it as a churn signal, for example to build suppression audiences.
2. Deploy the FunnelTrack pixel
The pixel captures the visitor's session before they check out, which is what makes deterministic attribution possible.
Install the FunnelTrack pixel on every page of your site, including any embedded checkout pages (embedded Checkout or the Payment Element on your own domain). The pixel writes a first-party session (ft_sid) and visitor id (ft_uid) for the visitor, which you then hand to Stripe in step 5.
Copy your pixel snippet from your FunnelTrack dashboard and paste it into the <head> of your site. For the most resilient setup that survives ad blockers and iOS restrictions, deploy it through the server-side loader.
checkout.stripe.com, so you can't install the FunnelTrack pixel there. Event tracking is still fully supported for Stripe-hosted checkouts: you attach ft_sid and ft_uidto the Checkout Session when you create it, so the conversion still stitches to the visitor's session. See step 5.3. Set up the Stripe webhook
Point Stripe at your FunnelTrack webhook URL, select the four events, and paste the signing secret back into FunnelTrack.
Copy your FunnelTrack webhook URL
In FunnelTrack, open Integrations → Stripe. Copy the Webhook URL shown under Connection Settings. It is unique to your workspace and looks like:
https://app.funneltrack.com/api/webhook/stripe/{your_workspace_id}Add the endpoint in Stripe
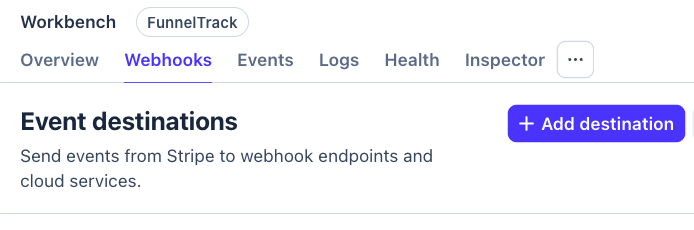
In Stripe, open Workbench → Webhooks and click Add destination. Paste the FunnelTrack webhook URL from your FunnelTrack Stripe integration page as the endpoint URL.
Select the four events
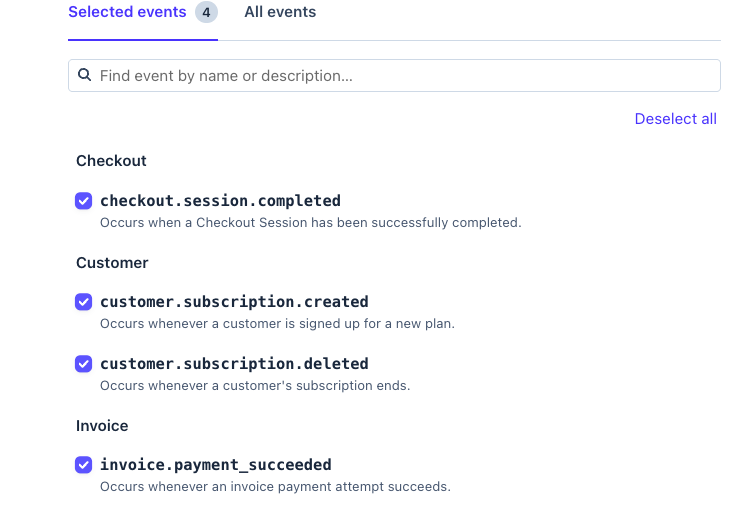
For Events to send, select these four. Together they cover every conversion FunnelTrack emits for Stripe:
- •
checkout.session.completed— Checkout Completed. - •
customer.subscription.created— Trial Started (when trialing). - •
invoice.payment_succeeded— Subscription Activated and Recurring Subscription Payment. - •
customer.subscription.deleted— Subscription Canceled.
Copy the signing secret into FunnelTrack
Save the endpoint, open it, and reveal the Signing secret (it starts with whsec_). Paste it into the Webhook Signing Secretfield on FunnelTrack's Stripe integration page.
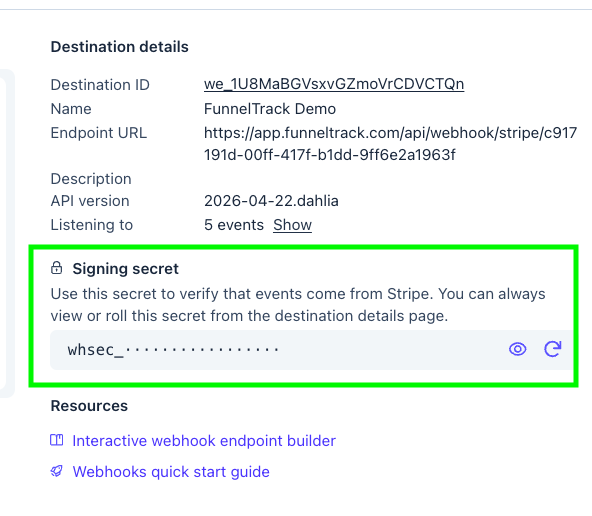
FunnelTrack verifies every incoming webhook against this secret. If Stripe's signature doesn't match, the event is rejected. Rotate it anytime by editing the field.
4. Create a restricted Stripe API key
The restricted key lets FunnelTrack enrich subscription and renewal events, which carry only a customer ID, with the buyer's email and address for higher Event Match Quality. It is the third credential FunnelTrack needs to be fully connected.
Create a restricted key
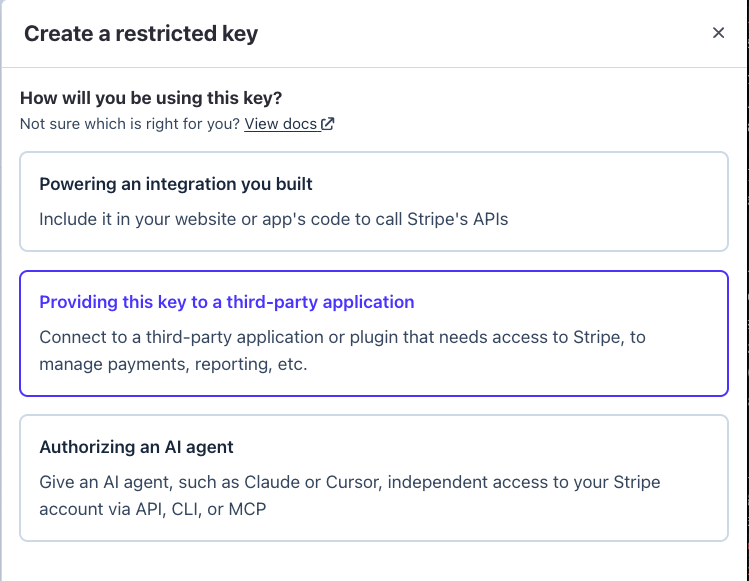
In Stripe, go to Developers → API keys → Create restricted key. When asked how you'll use it, choose Providing this key to a third-party application.
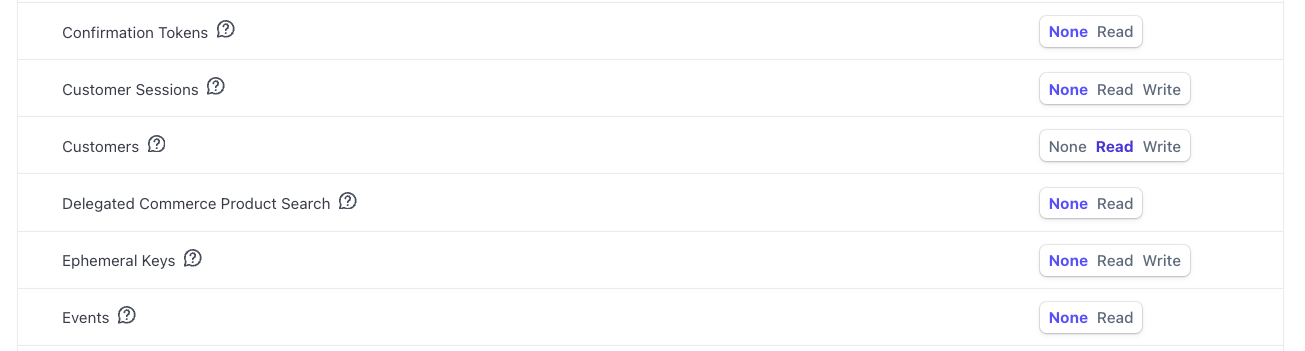
Grant read access to Customers
Set the Customers permission to Read. Leave everything else at None. FunnelTrack only needs to look up customer details, never to write.
Copy the key into FunnelTrack
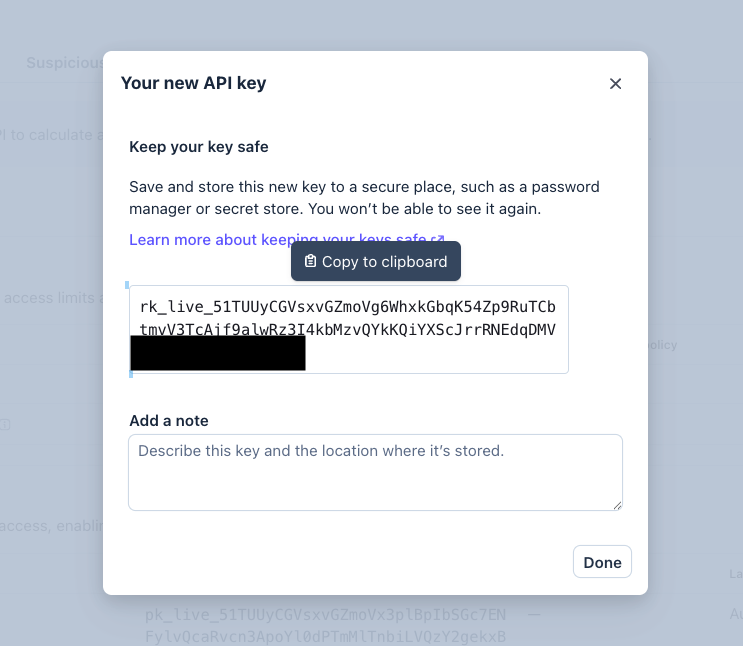
Create the key, copy the rk_live_… value (Stripe shows it once), and paste it into the API Keyfield on FunnelTrack's Stripe integration page.
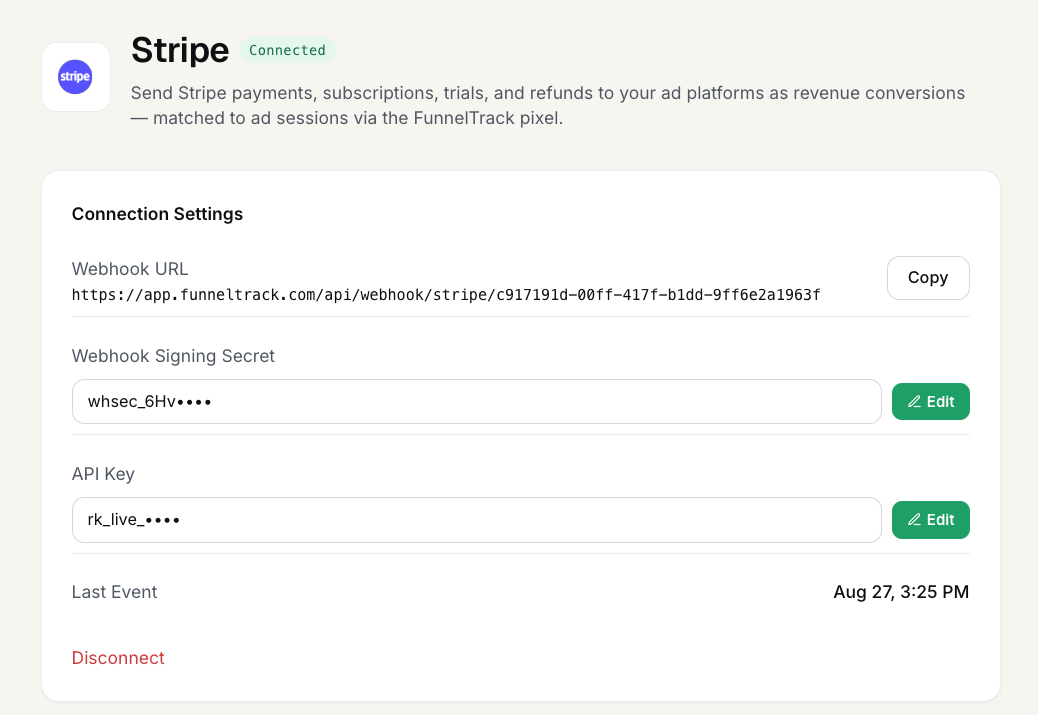
FunnelTrack considers the Stripe integration fully connected once all three credentials are in the dashboard: the Webhook URL (pointed at Stripe in step 3), the Webhook Signing Secret, and the API Key. With all three saved, Connection Settings shows a Connected badge and the time of the last received event.
5. Configure metadata capture
Pin the visitor's FunnelTrack IDs onto the Checkout Session so every Stripe event stitches back to the exact ad click.
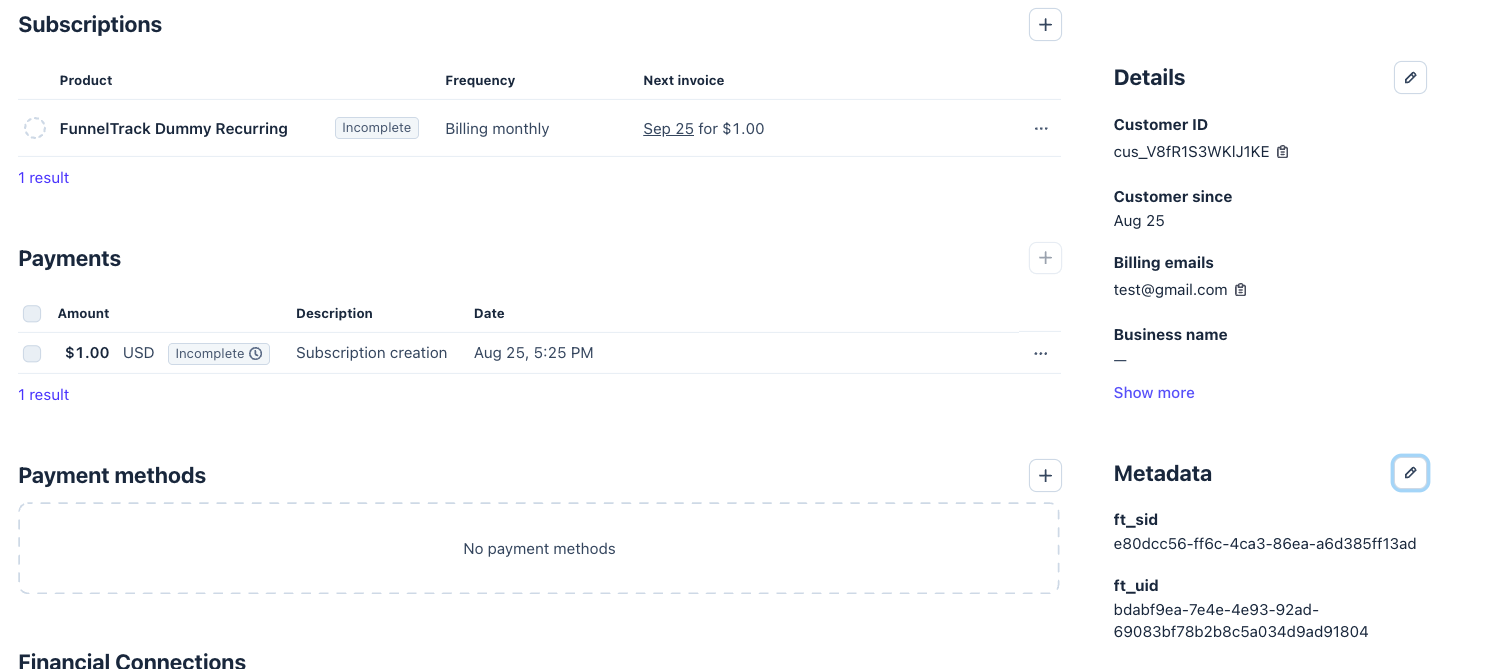
ft_sid is the FunnelTrack session id and ft_uid is the FunnelTrack visitor id. The pixel you deployed in step 2 creates both when a visitor lands on your site and stores them in first-party cookies. The session id is tied to a single visit (and the click IDs, UTMs, and referrer captured on it); the visitor id is durable and follows the same person across visits.
Stripe webhooks arrive on FunnelTrack's server with no browser context, so they carry no cookies. Passing ft_sid and ft_uidthrough the Checkout metadata is what lets FunnelTrack tie the payment back to the exact ad session that produced it. Without them, the conversion can't be matched to a click, and the enriched data (click ID, identity, campaign) never reaches your ad platforms.
When you create a Checkout Session server-side, read the session id off window.ft.getSessionId() and the visitor id off window.ft.getUserId() in the browser, send them to your server, and pin both as ft_sid and ft_uid. For subscriptions, also pin them onto subscription_data.metadata so renewals stay attributed.
// Server-side: when creating the Checkout Session
const session = await stripe.checkout.sessions.create({
  mode: "subscription", // or "payment"
  ui_mode: "hosted",    // or "embedded"
  line_items: [/* ... */],
  // Session-level pin — propagates to checkout.session.completed
  metadata: {
    ft_sid: ftSid, // from window.ft.getSessionId()
    ft_uid: ftUid, // from window.ft.getUserId()
  },
  // Subscription-level pin — propagates to customer.subscription.created
  // and every future invoice.payment_succeeded
  subscription_data: {
    metadata: { ft_sid: ftSid, ft_uid: ftUid },
  },
  success_url: "https://yoursite.com/success",
});Once pinned, the IDs appear on the customer and subscription in Stripe:
?client_reference_id={ft_sid} to the link URL. FunnelTrack reads client_reference_id as a hard-stitch source, so Payment Link and no-backend Checkout flows still attribute deterministically. Build the value from window.ft.getSessionId() before sending the visitor to the link.For copy-paste code covering the pixel JS API, embedded Checkout and Payment Intents, Payment Links, and where FunnelTrack reads each value, see the developer guide: Capture ft_sid & ft_uid in Stripe metadata.
6. Enable event tracking
Turn on the Stripe events you want and map each to the matching destination event.
Open your Stripe source in FunnelTrack and pick a destination (for example Meta Conversions API). Toggle on the events you want to send, choose the destination event each one maps to (Checkout Completed → Purchase, Trial Started → StartTrial, Subscription Activated → Subscribe, and so on), then click Save Configuration. Repeat per destination.
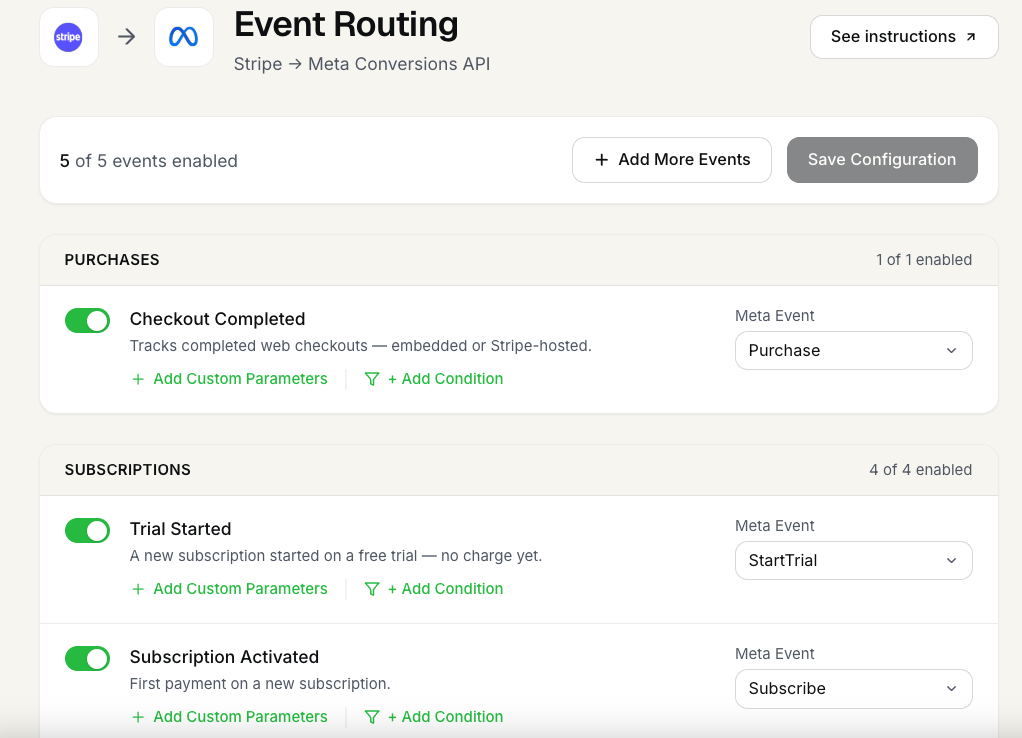
You can add custom parameters or conditions per event, and map extra fields into user_data from the same screen.
7. Verify event tracking and metadata capture
Run a real (or test-mode) checkout and confirm the events land, deliver, and carry your ft_sid / ft_uid.
Check the Event Delivery Log
Complete a checkout, then open the Event Delivery Log. You should see an inbound (IN, "received") row for each Stripe event, and a matching outbound (OUT, "delivered") row to each destination you enabled.
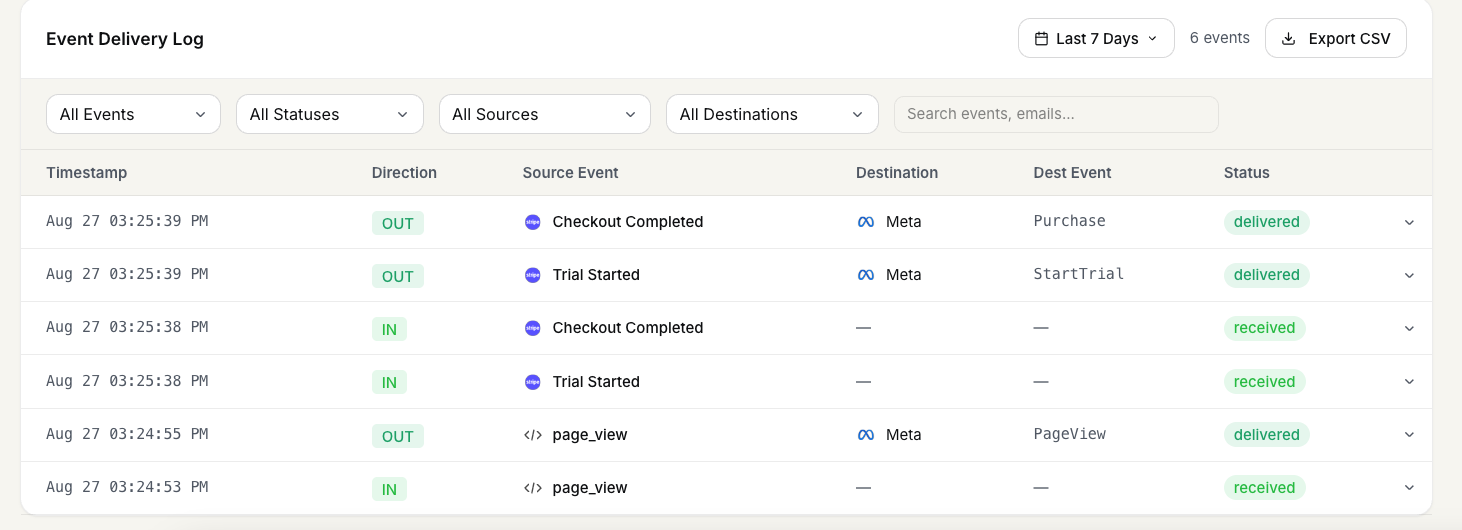
Confirm the metadata was captured
Expand an inbound Stripe event and check its payload. The metadata block should contain the ft_sid and ft_uidyou pinned in step 5. That confirms the event will allow FunnelTrack to attribute this interaction to the visitor's web session captured by the pixel.
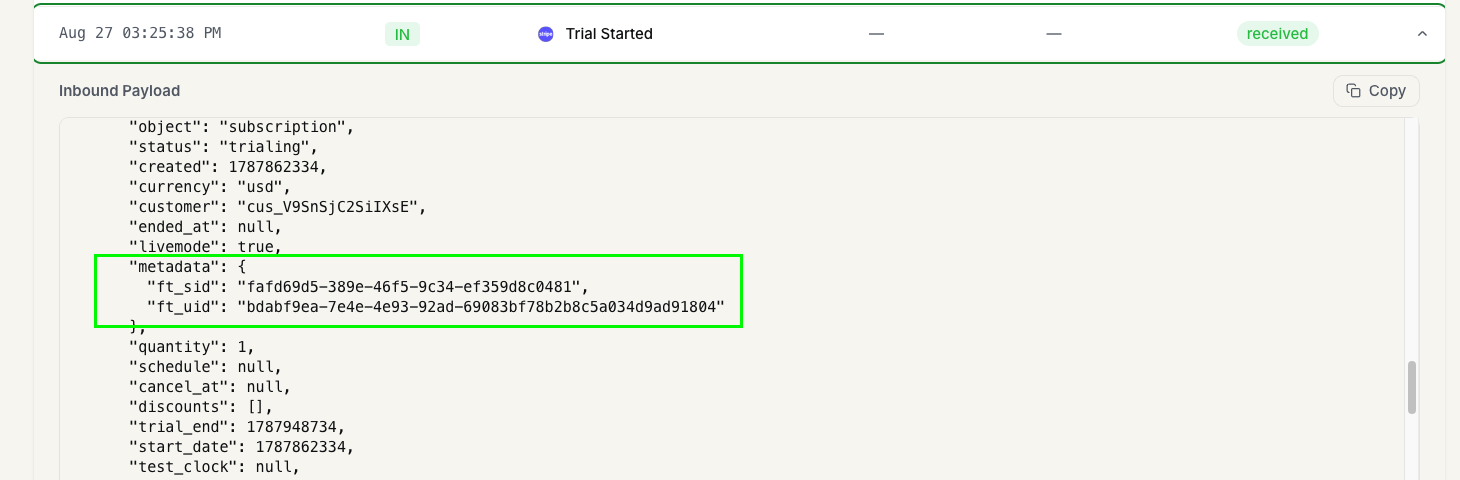
ft_sid, the pixel wasn't loaded when the Checkout Session was created, or the IDs weren't pinned onto the session metadata. Re-check steps 2 and 5.